Welcome to the Guide on How to Root Android. We will get to know about rooting and cover the essential aspects of rooting conjoined with its drawbacks, and we will present a comprehensive and detailed guide to root your Android smartphone easily.
While browsing the web, you might have come across a term called root, adhering to either Android phones, iPhones, or Linux machines. Or maybe you kind of know what it is but unable to express the process. Or you might already possess a rooted Android device and are looking for additional utilization methods of this precious unlocked segment. Regardless of the reason, we are here to help you out during such troubling times.
Disclaimer: By attempting any of the steps or processes listed in this guide, you take the total liability of any repercussions. We will not be held or considered responsible if your device/gadget stops working or catches fire in any circumstance or situation.
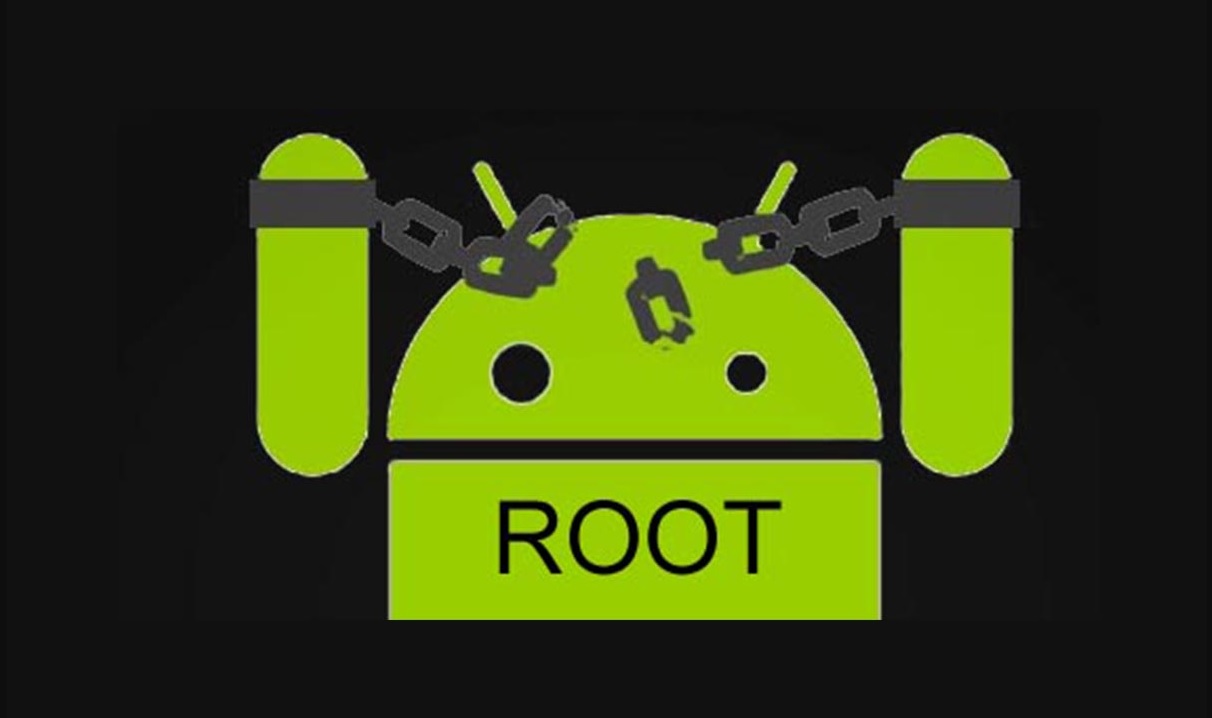
What is Rooting in Simple Terms
In short and precise terms, rooting is the process of modifying the Android operating system by allowing the user to access hidden ability for deep customizations. Having root access grants special permission to the user and allows easy management of the hidden partition of internal storage. Rooting makes the lifting of chains of restrictions imposed by Android device manufacturers possible.
Should you root Android
The choice of rooting Android lies solely on you. Some users might root Android because
- They want to use the phone to the fullest extent via overclocking the CPU and RAM clock speeds.
- They want to decrease the load on the Android by removing bloatware or perform deep cleaning services to free up space.
- Managing the phone becomes easier through maintaining automatic tasks.
- They want to install a custom ROM to update the Android version where the device manufacturer has stopped pushing system updates.
- Backing up an Android phone becomes more comfortable as users can save partitions of the internal storage to a MicroSD card or OTG from the custom recovery.
- It is simply entertaining to take a deep look at the internals of an Android phone.
Things to keep in mind before rooting
However, rooting an Android phone, like everything, comes with its own set of drawbacks. We shall emphasize this because WE WILL NOT TAKE ANY RESPONSIBILITY IN CASE OF PERMANENT BRICK OF PHONE. So ensure to read the following points carefully:
- ROOTING MIGHT VOID YOUR WARRANTY: Most device manufacturers dissuade their users from rooting their phones and installing a custom ROM because they think they are losing their trademark in their device. And one way of discouraging is to deny free device support for rooted mobiles under warranty. But if your Android device is well out of warranty period, you can happily proceed further.
- CHANCE OF BRICKING PHONE: If anything goes wrong while rooting, or your charge depletes, or if any error occurs, you risk the possibility of making your device completely unusable. Two types of brick can mainly occur – Soft brick, having higher recovery chances, and Hard brick, which usually cannot be recovered, especially in newer phones. So follow the steps carefully and maintain the prerequisites.
- SECURITY CONCERNS: Android places severe warnings before unlocking the bootloader and rooting. The warning notification implies that rooting or gaining unrestricted access to the internal system files of your phone strips away a thick layer of security. After rooting, your phone becomes vulnerable to malware, viruses, hijackers alike. Therefore, users must accept the sheer responsibility of locking the custom recovery with a passcode and managing the root permission requirement of various apps.
Prerequisites before rooting
Take a deep breath, pause for a while, and relax before rooting your phone. The delicate process requires perseverance and calmness. Before rooting, proceed to XDA Forums webpage, type in your device name and model, and do proper research on rooting procedures specific to your particular model. We will outline the steps common to most devices, but XDA is the best site for in-depth details.
Here are the things you require for rooting:
- A laptop or desktop with an internet connection
- An Android device that is properly functioning and has at least 80 percent charge.
- A working USB cable to make a proper connection between Android device and laptop/ desktop.
Backing Up your Android Device
The most important task before rooting is to make a proper backup of the necessary things for your daily life. We already have a comprehensive article for backing up Android devices, so kindly follow our article on How to Back Up Android Smartphones. We recommend the offline method for backup since rooting Android is a risky task.
Enabling USB Debugging and OEM Unlocking
These two inbuilt settings are a must for rooting Android devices. Enabling USB Debugging allows the computer to execute ADB commands on your Android device. Through OEM unlocking, users avail the facility to unlock and relock the bootloader at their own will. Both options come under the hidden ‘Developer options.’ Let’s see how to enable them.
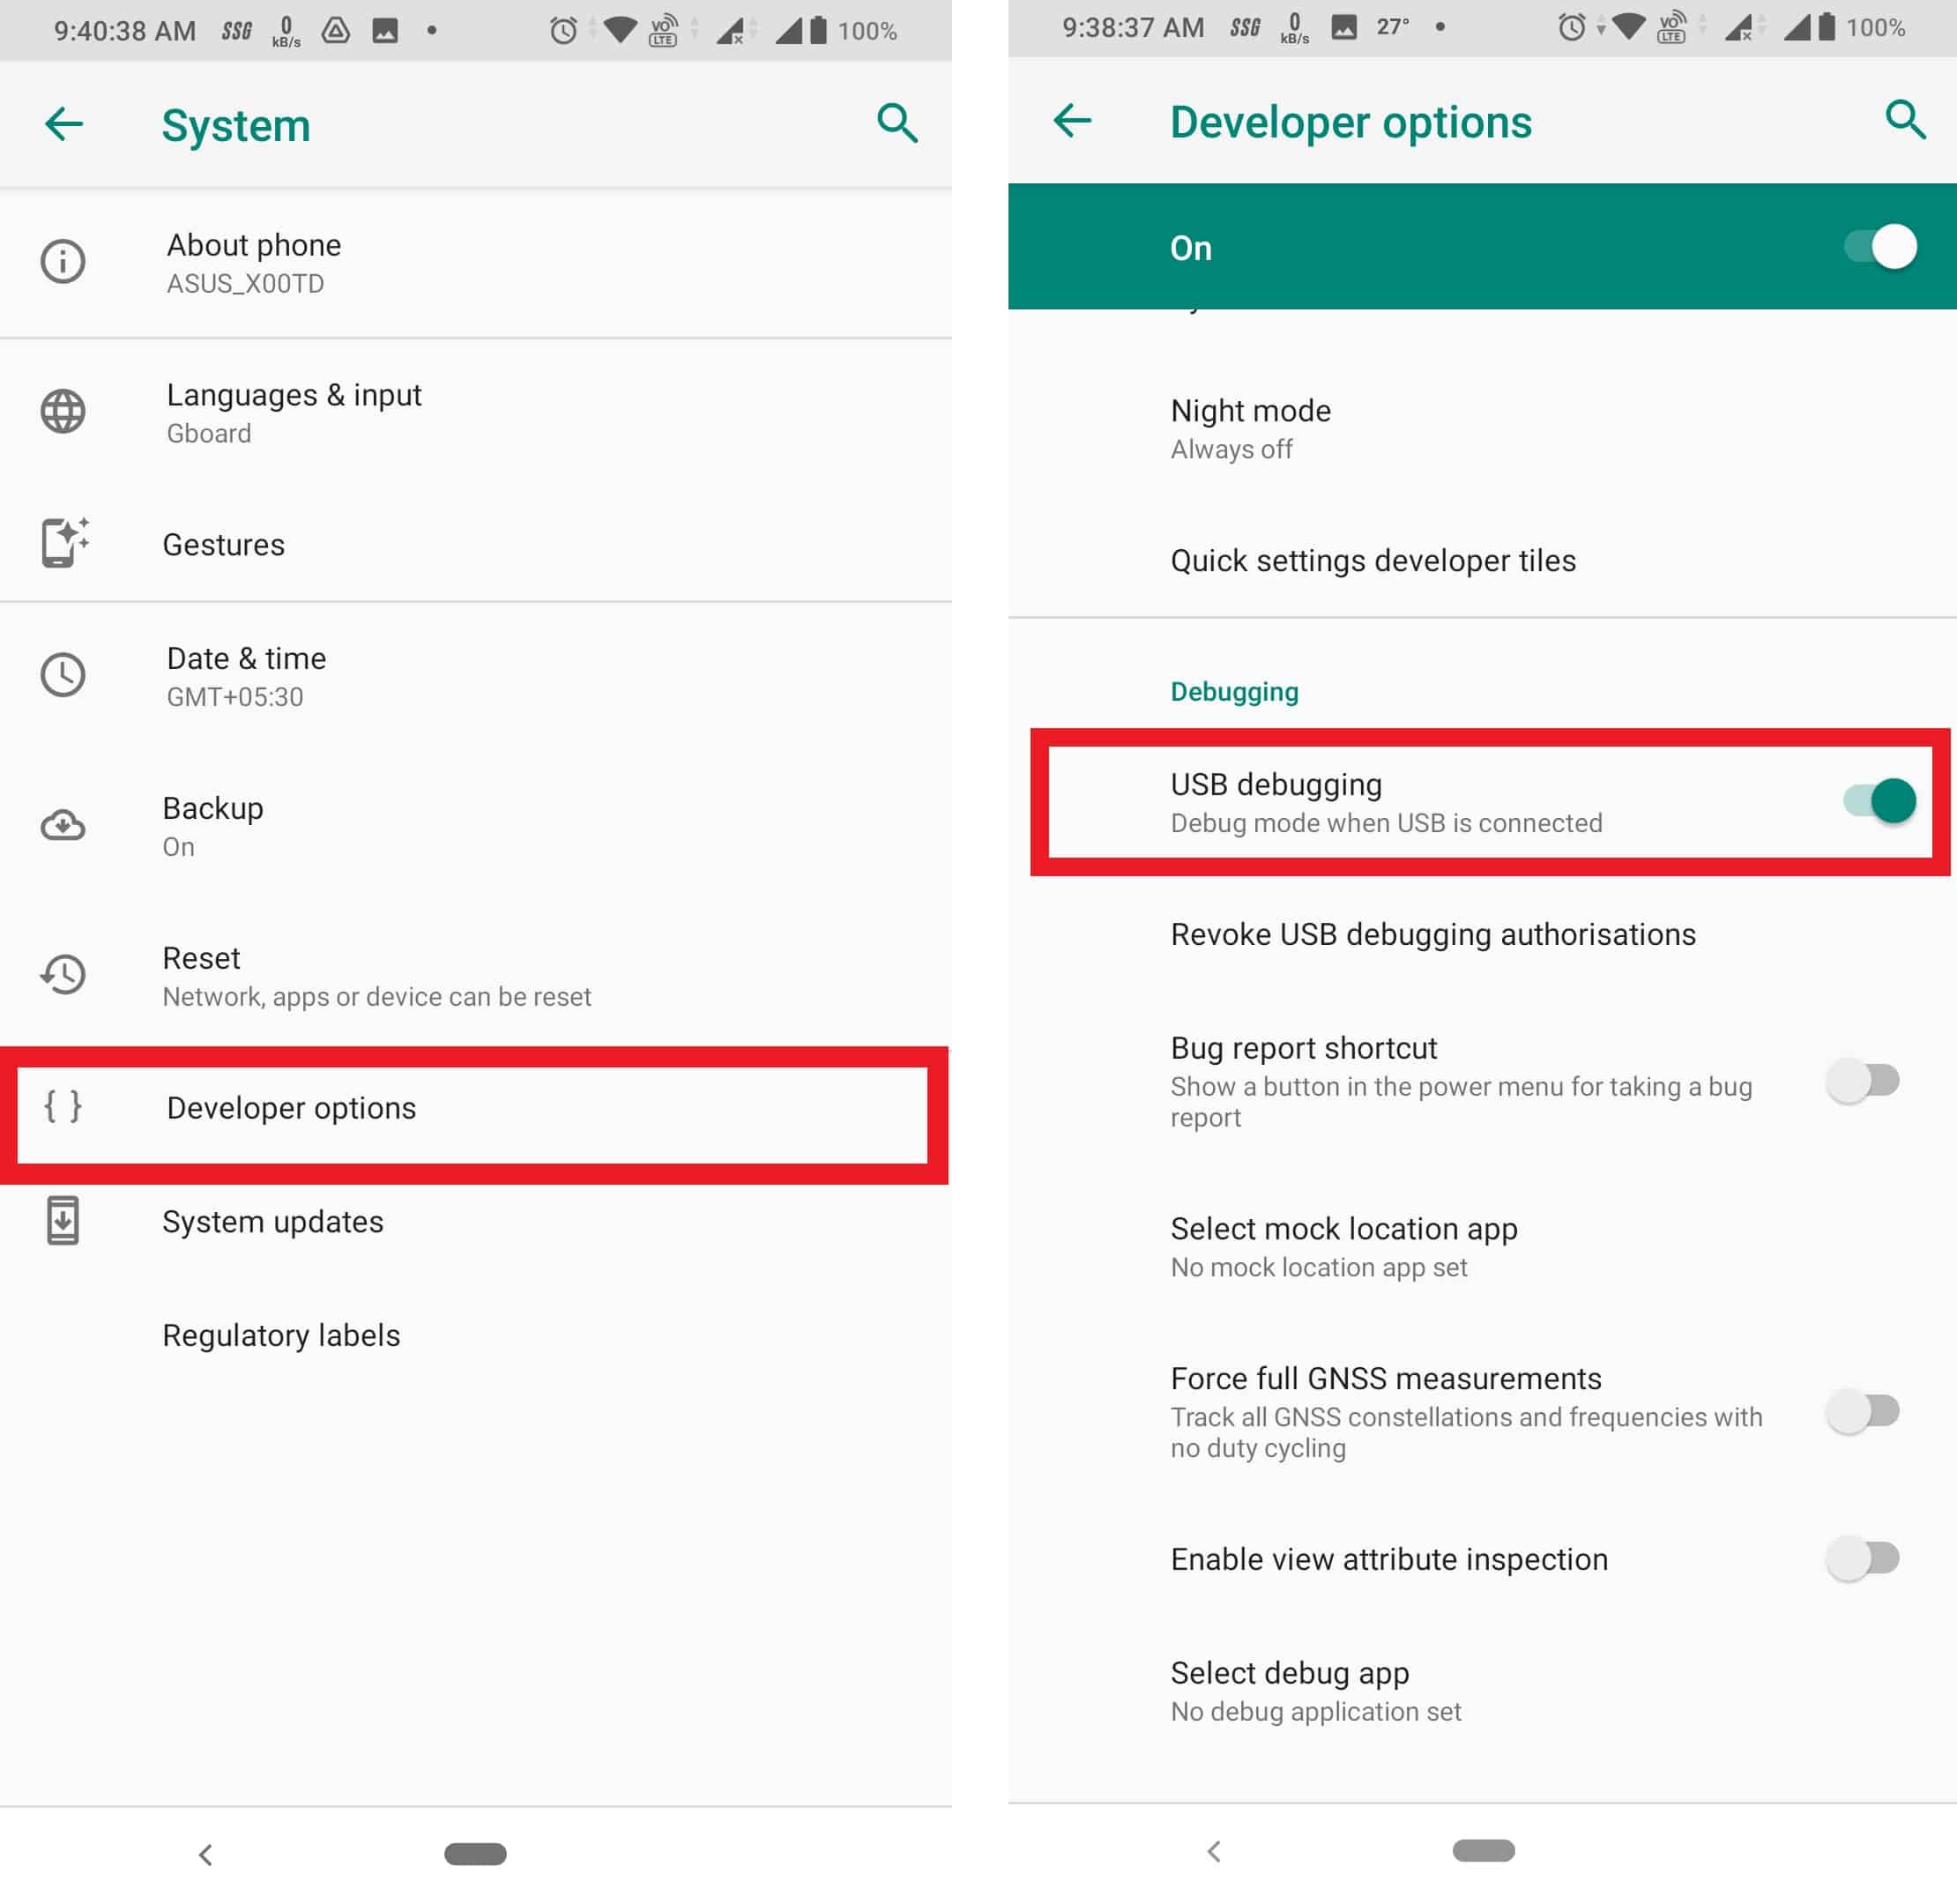
- Start the Settings app from the app drawer.
- Scroll to the bottom to find System, and tap About phone.
- At the info list’s end, press Build number 7 times, upon which a toast notification displays that you are now the developer.
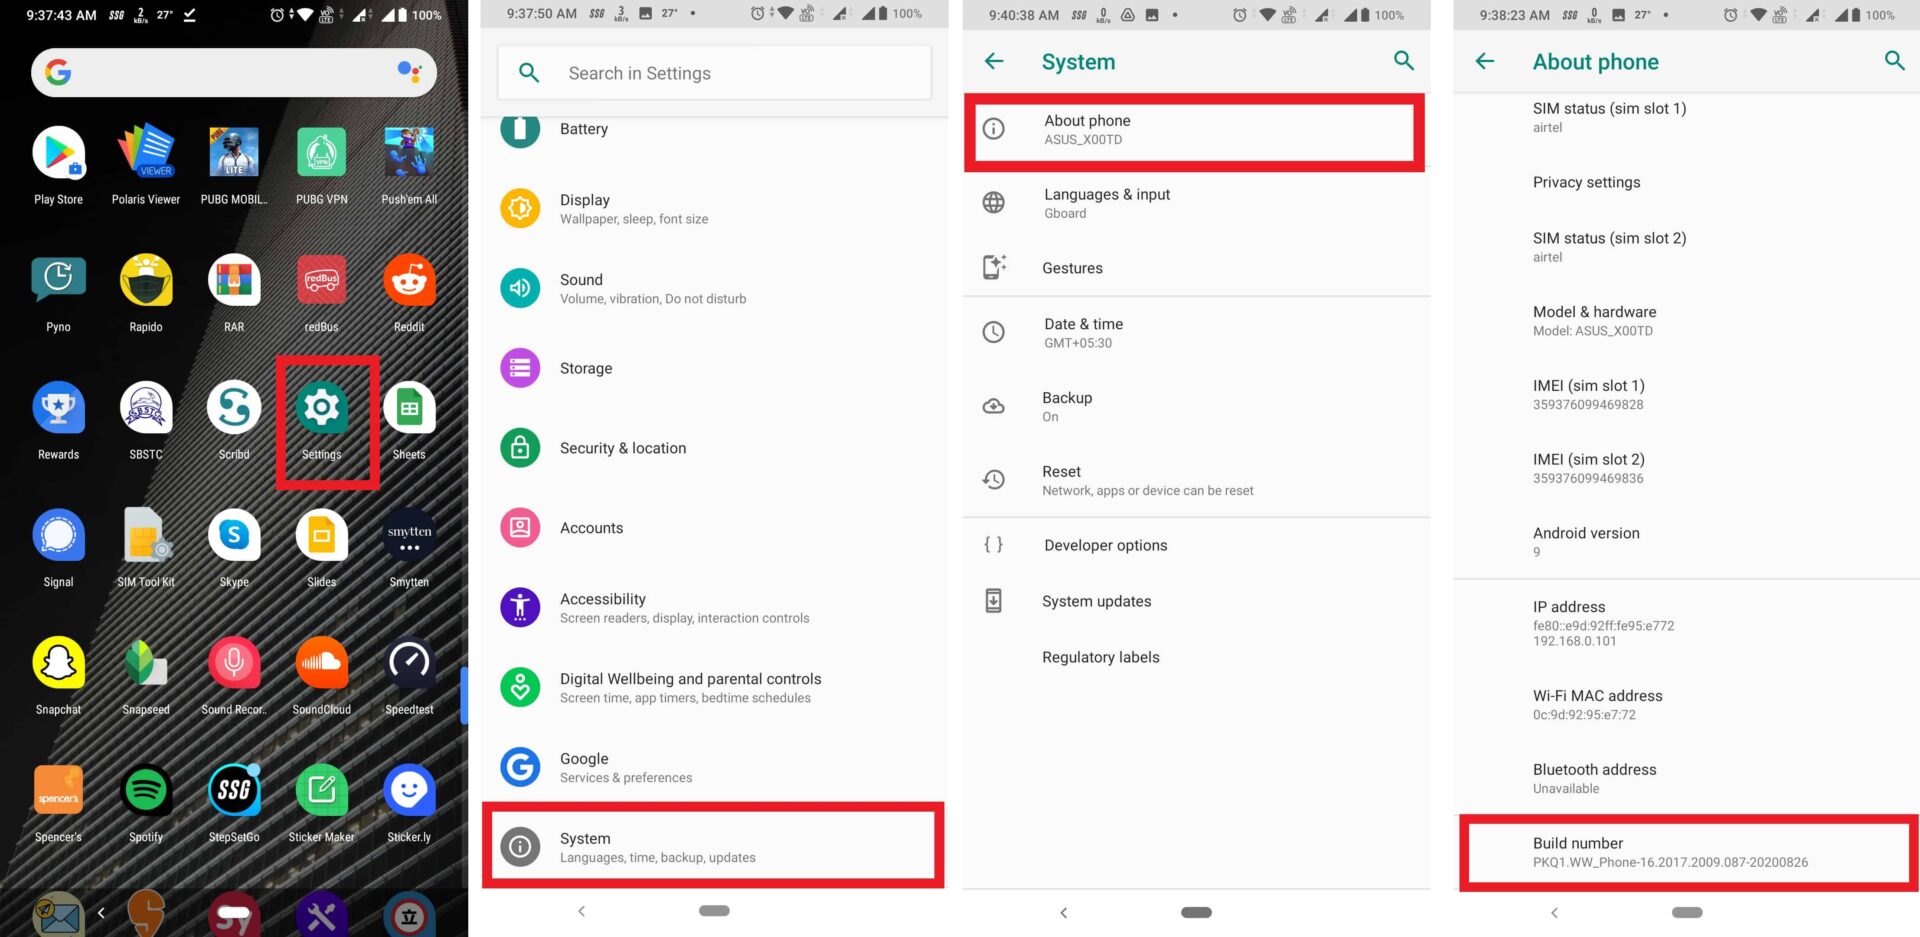

- The Developer options will now be available under Advanced.
- Find USB debugging and OEM Unlocking and enable them both.

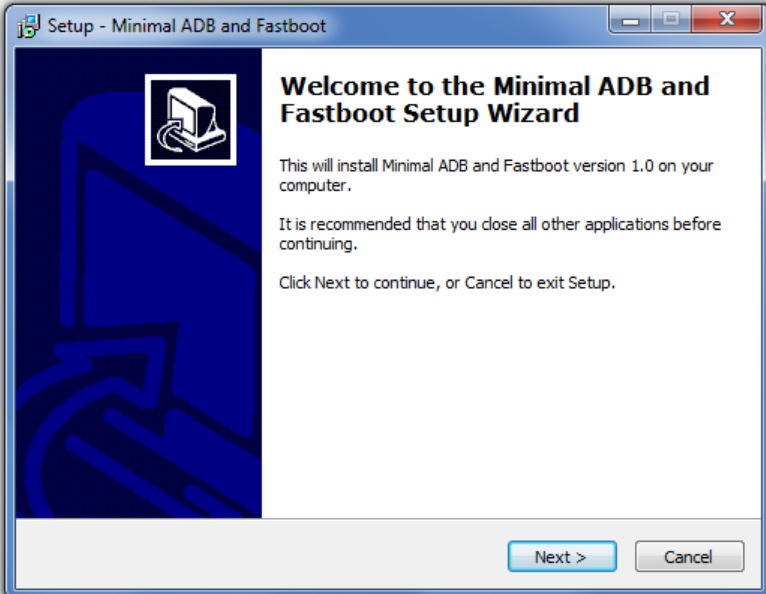
Installing Minimal Android SDK Platform Tools on PC
Rooting involves the utilization of two specific tools – ADB (Android Debugging Bridge) and fastboot (used for running commands while the phone is in fastboot mode). These tools are made available under the Android SDK Development package used for building apps, but we need the package’s minimal version. Download it from this link: Minimal ADB and Fastboot. After downloading, install the package on your PC, preferably on Local Disk C. Remember the location where it is being installed.

Installing ADB USB drivers
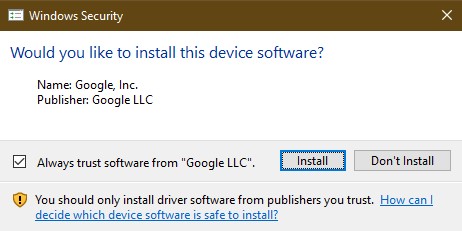
ADB USB drivers ensure proper communication of the phone and PC through command prompt using the ADB tool as installed above. Nowadays, almost all devices install USB drivers upon connection with a PC, but we need to install the ADB driver separately. The driver can be installed from the following link: Universal ADB driver. While installing, accept the permission for verification of the driver’s signature. After it is done, proceed to the next step.

Unlocking the Bootloader
The bootloader is a platform application that helps in loading the Android operating system on our device. So we need to unlock the bootloader to root Android, as the process paves our way towards replacing the stock recovery with a custom TWRP recovery image. Some manufacturers like Motorola, HTC, LG, Sony provides detailed assists on unlocking bootloader, but for other venders, feel free to consult XDA for the best way to unlock the bootloader.
I am using ASUS Zenfone Max Pro M1 here to unlock the bootloader, but it should be similar for other phones:
THIS PROCESS WILL WIPE ALL DATA ON YOUR DEVICE.
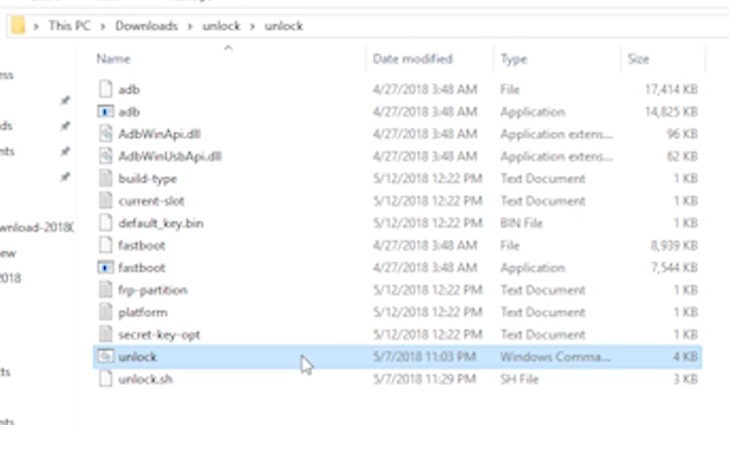
- Download this file unlock.rar on your PC and extract it using WinRAR.
- You will receive 2 folders -“ASUS_Android_USB_drivers_for_Windows” and “unlock“. Open the unlock folder, which contains the bootloader unlocking script.
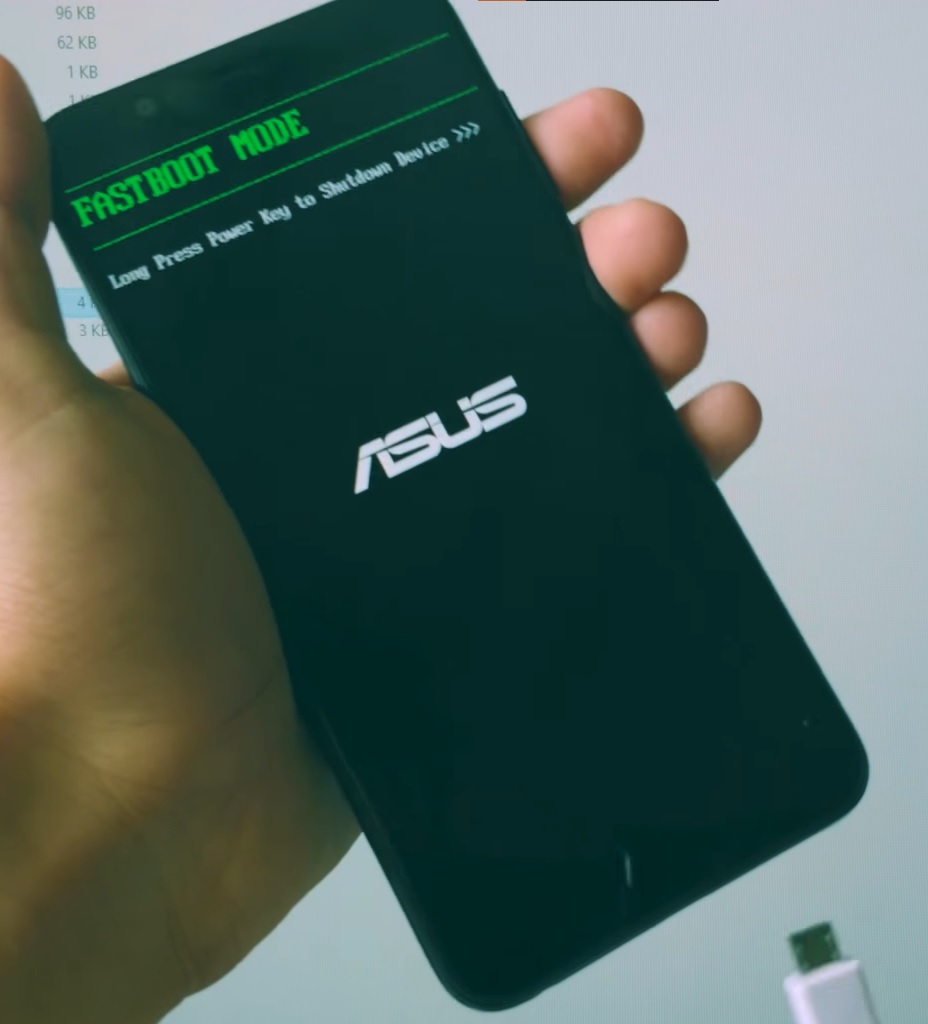
- Now head over to your phone, and long-press the power button to Power Off the device completely.
- Then you must hold the Power button and the Volume Up button together for 5 seconds. the phone will vibrate and show FASTBOOT MODE on the screen.

- Use a USB cable to connect your phone to your PC. Go to the unlock folder and double-click on the “unlock. cmd” file. A script will run through the command prompt, and then your device will automatically reboot.

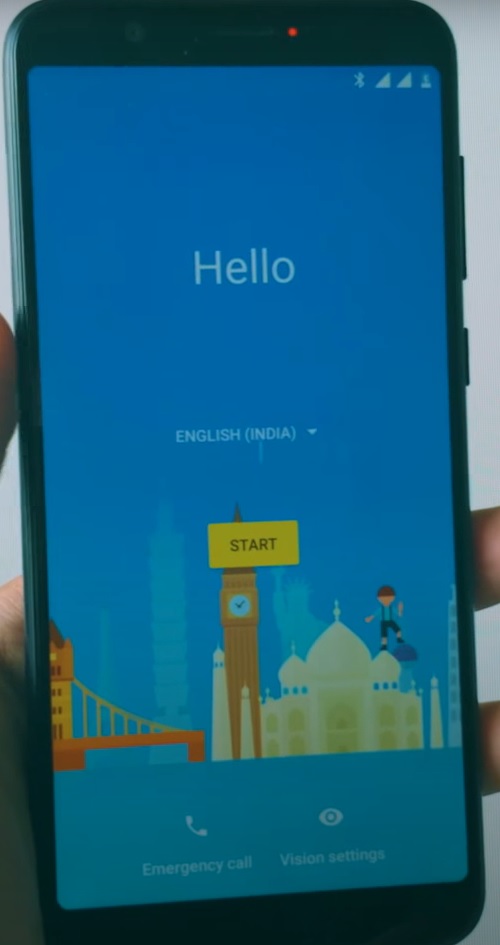
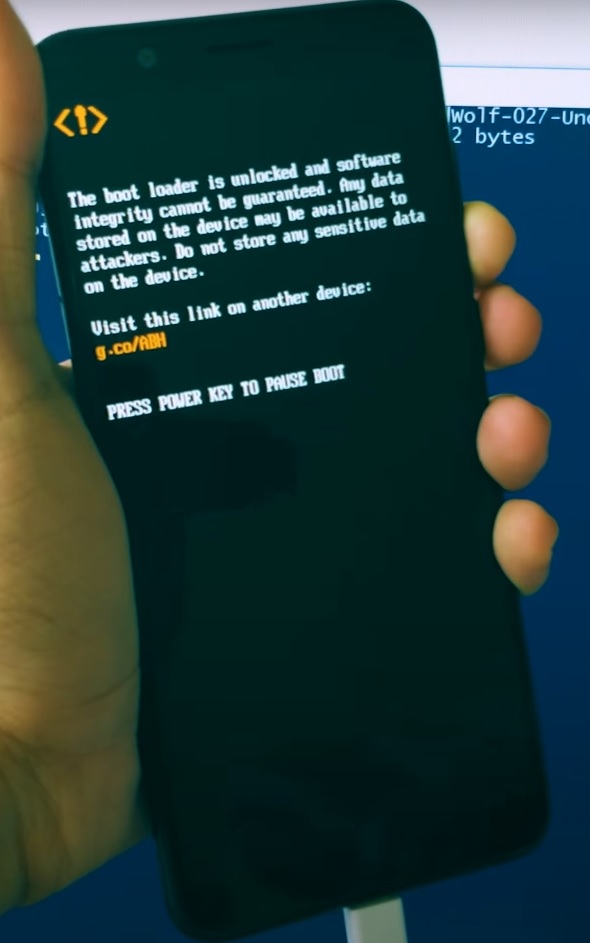
- A fresh new device welcome screen notifies you that your data has been deleted, and you have successfully unlocked your bootloader.

Installing Custom Recovery
All Android phones come with a stock recovery, which contains a set of tools for formatting devices, resetting battery stats, installing applications through ADB, etc. Well, the stock recovery comes with limited accessibility, and we require high-level access so that we can root Android. Custom recovery, which are third-party recoveries for Android, grants us extensive functionalities such as rooting Android, installing custom ROM, decrypting internal storage, elevated file transfer, etc.
In this article, we will use Red Wolf Recovery, which is a modified version of TWRP custom recovery. You can use your preferred recovery image here as well.
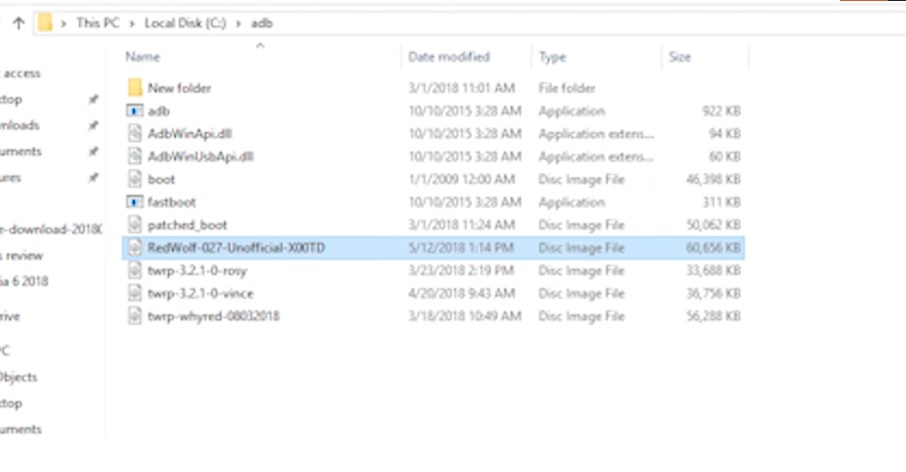
- Download RedWolf Recovery from this link on your PC, and transfer this to the “unlock” folder shown above.

- Enable USB Debugging and OEM Unlocking again as the settings were reset after unlocking the bootloader.
- Reboot to the fastboot mode on your Android device again as depicted in the previous step, and connect it to your PC using a USB cable.
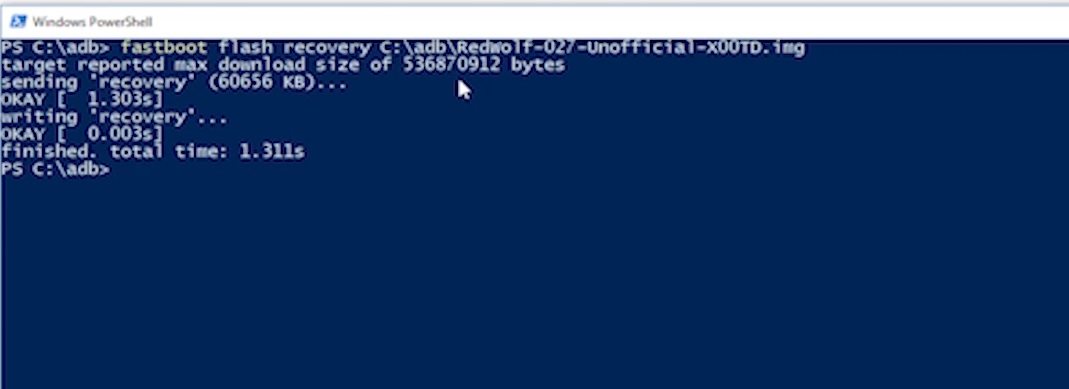
- On your PC, right-click and click Open Powershell window here.
- Execute fastboot devices, and the window displays your connection followed by a code.
- Type fastboot flash recovery recovery.img, where replace “recovery.img” with the original name of the custom recovery image, and press Enter.
- After Okay confirmation in Powershell, you have installed a new recovery.

- Boot into the recovery by holding down the POWER + VOLUME DOWN buttons for a few seconds until vibration.

- Proceed to the next step to root completely.
Rooting by Flashing Magisk
Magisk represents the set of functions that enable a normal user to gain root privileges. Through Magisk we can perform systemless root, which modifies the system without actually modifying it. Moreover, it helps bypass Google’s SafetyNet verification status and can hide the root status from banking and UPI apps. We have to flash the Magisk zip file along with “decrypt.zip” (It removes the default encryption of the Internal Storage so that Magisk and the recovery can make necessary modifications) through the custom recovery. We are proceeding from the steps above:
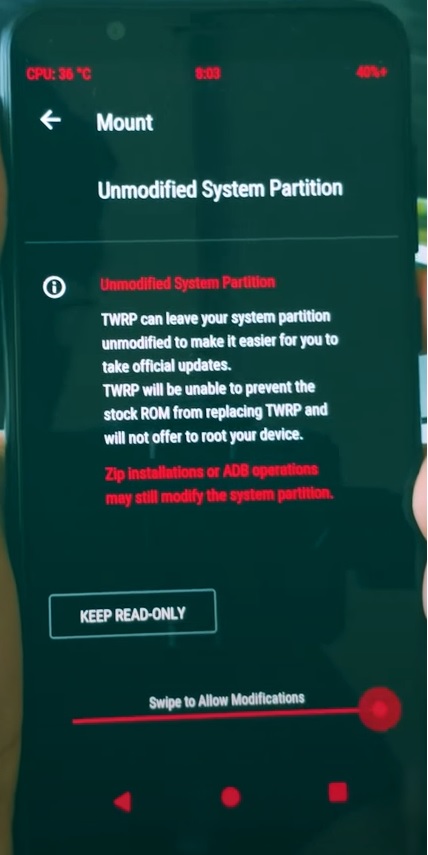
- After booting into the custom recovery, tap back when asked for a password.


- Under the Unmodified System Partition, slide the pointer right to allow modifications.

- Tap Wipe, and slide right on the next screen to perform a clean format of the internal partitions.
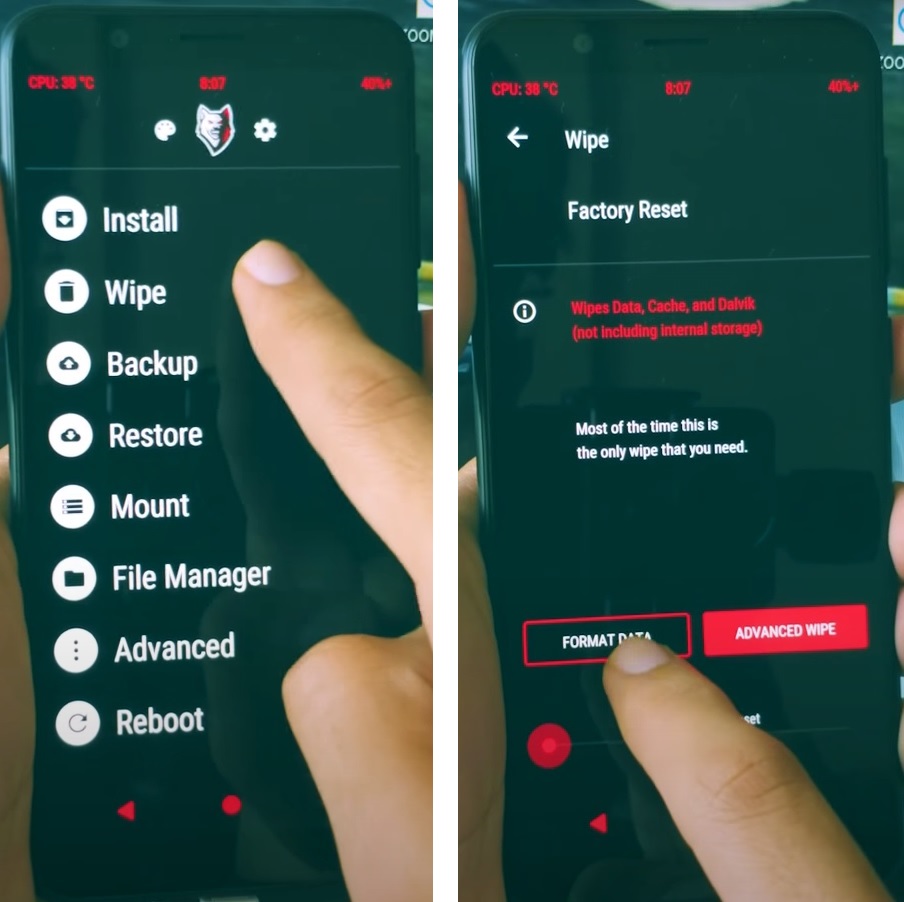

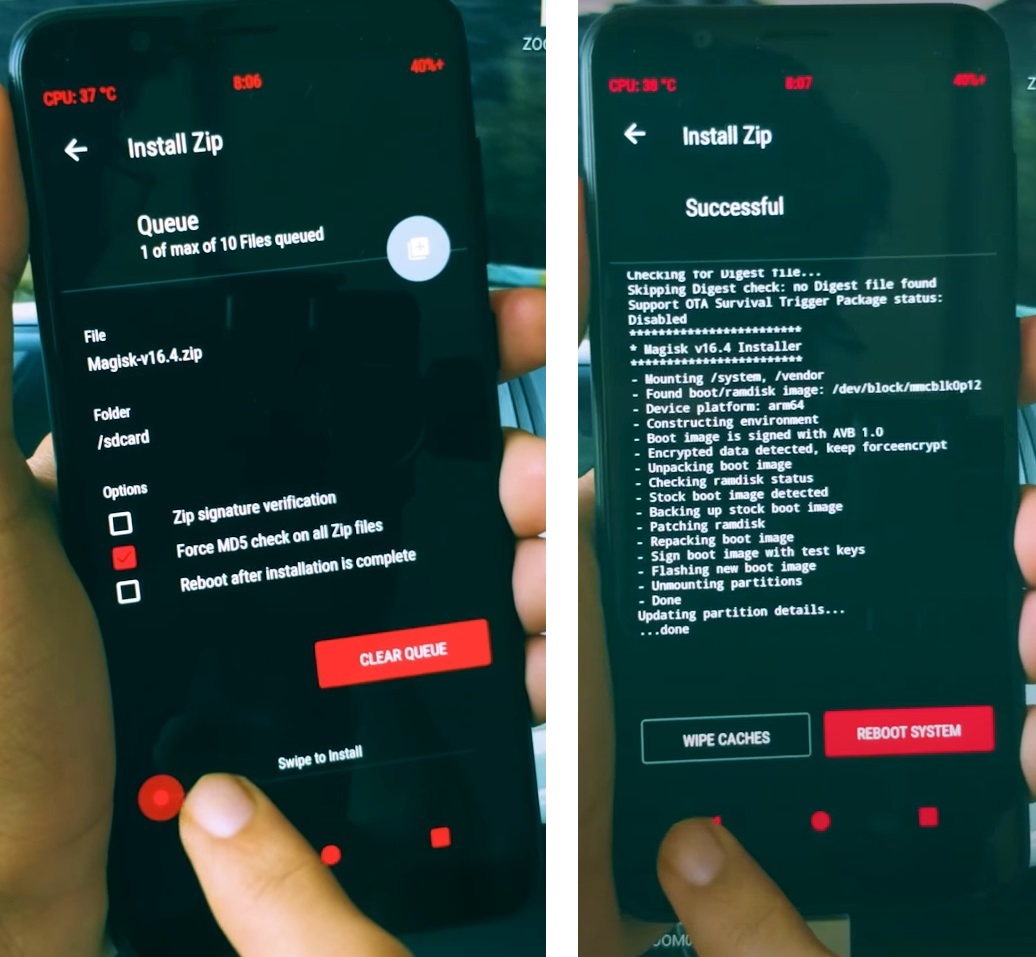
- On your PC, download Magisk and decrypt.zip. Transfer it to an SD card or OTG, and connect it to your phone.
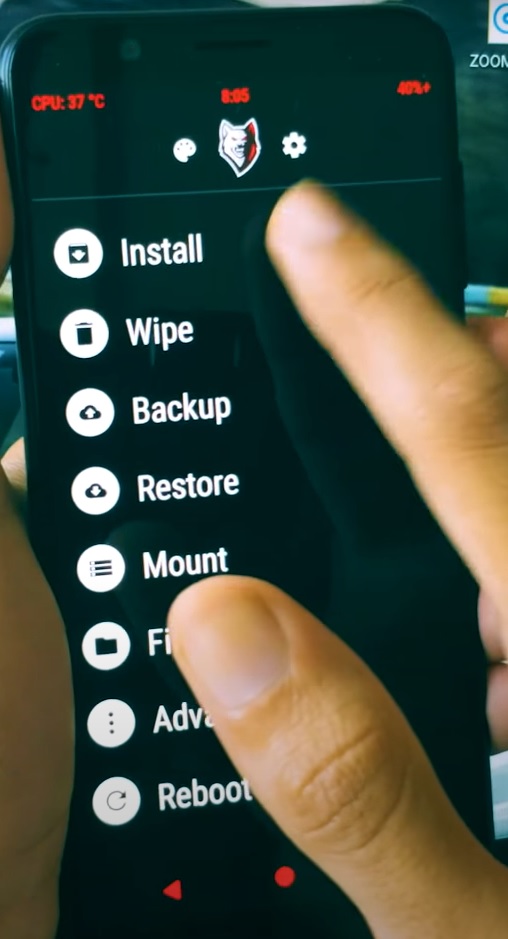
- We can flash zips in RWRP by tapping Install from the main menu. Tap Select Storage, and browse to the SD card or OTG.

- First, we flash the Magisk file by selecting it, confirming by sliding right, waiting for the process to complete, and clearing the cache.

- We will do the same for the decrypt.zip file.
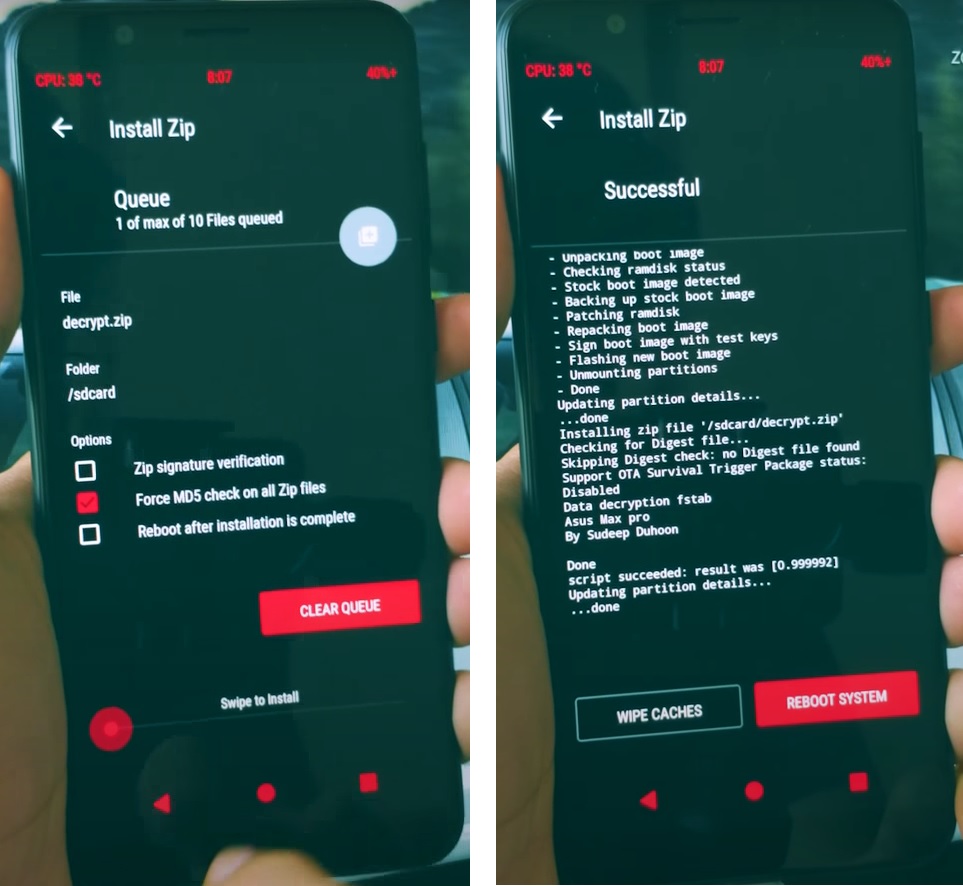

- Voila, now we have successfully rooted our Android device. Wipe the data partition and reboot to exit from the recovery. It might take a few minutes to boot after rooting for the first time, so wait patiently without panicking.
- After booting, install the Root Checker app and the Magisk app to check the root status and install system-less Magisk modules.
Conclusion
So we have finally managed to root Android and through this, we get to explore a new amazing and dark side of Android. Follow up with a list of apps to install after rooting to get the most out of your rooting experience. Thanks for going through the whole article and let us know about your rooting experience.